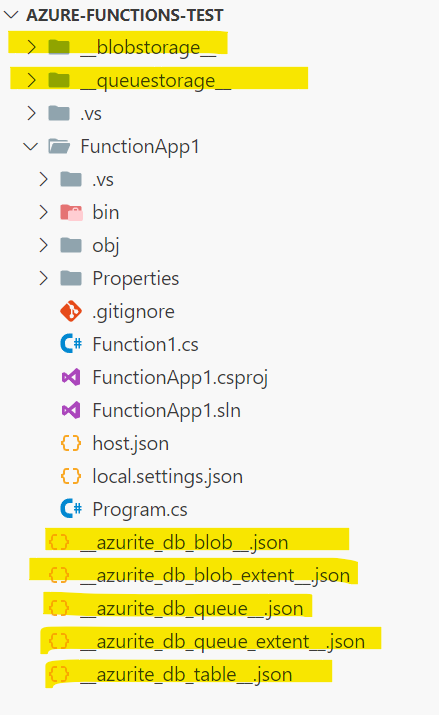
In the old days, developers relied on the Azure Storage Emulator to emulate Azure Storage services locally. However, Azure Storage Emulator has been deprecated and replaced with Azurite, which is now the recommended way to emulate Azure Blob, Queue, and Table storage locally. In this post, let’s see how to set up exclusions in Visual Studio Code to prevent unwanted Azurite files from cluttering your workspace while working with Function Apps.
Imagine being in a scenario where a file of type .tar.gz lands in your Azure Blob Storage container. This file, when uncompressed, yields a collection of individual files. The trigger event for the arrival of this file is an Azure function, which springs into action, decompressing the contents and transferring them into a different container.
In this context, a team may instinctively reach out for a robust library like SharpZipLib. However, what if there is a mandate to accomplish this without external dependencies? This becomes a reality with .NET 7.
In .NET 7, native support for Tar files has been introduced, and GZip is catered to via System.IO.Compression. This means we can decompress a .tar.gz file natively in .NET 7, bypassing any need for external libraries.
This post will walk you through this process, providing a practical example using .NET 7 to show how this can be achieved.
.NET 7: Native TAR Support
As of .NET 7, the System.Formats.Tar namespace was introduced to deal with TAR files, adding to the toolkit of .NET developers:
System.Formats.Tar.TarFile to pack a directory into a TAR file or extract a TAR file to a directory
System.Formats.Tar.TarReader to read a TAR file
System.Formats.Tar.TarWriter to write a TAR file
These new capabilities significantly simplify the process of working with TAR files in .NET. Lets dive in an have a look at a code sample that demonstrates how to extract a .tar.gz file natively in .NET 7.
Consider this situation: you have a zip file stored in an Azure Blob Storage container (or any other location for that matter). This isn’t just any zip file; it’s large, containing gigabytes of data. It could be big data sets for your machine learning projects, log files, media files, or backups. The specific content isn’t the focus - the size is.
The task? We need to unzip this massive file(s) and relocate its contents to a different Azure Blob storage container. This task might seem daunting, especially considering the size of the file and the potential number of files that might be housed within it.
Why do we need to do this? The use cases are numerous. Handling large data sets, moving data for analysis, making backups more accessible - these are just a few examples. The key here is that we’re looking for a scalable and reliable solution to handle this task efficiently.
Azure Data Factory is arguably a better fit for this sort of task, but In this blog post, we will specifically demonstrate how to establish this process using Azure Functions. Specifically we will try to achieve this within the constraints of the Consumption plan tier, where the maximum memory is capped at 1.5GB, with the supporting roles of Azure CLI and PowerShell in our setup.
Setting Up Our Azure Environment
Before we dive into scripting and code, we need to set the stage - that means setting up our Azure environment. We’re going to create a storage account with two containers, one for our Zipped files and the other for Unzipped files.
To create this setup, we’ll be using the Azure CLI. Why? Because it’s efficient and lets us script out the whole process if we need to do it again in the future.
Install Azure CLI: If you haven’t already installed Azure CLI on your local machine, you can get it from here.
Login to Azure: Open your terminal and type the following command to login to your Azure account. You’ll be prompted to enter your credentials.
1
az login
Create a Resource Group: We’ll need a Resource Group to keep our resources organized. We’ll call this rg-function-app-unzip-test and create it in the eastus location (you can ofcourse choose which ever region you like).
1
az group create --name rg-function-app-unzip-test --location eastus
Azure DevTest Labs offers a powerful cloud-based development workstation environment and great alternative to a local development workstation/laptop when it comes to software development. This blog post is not so much talking about the benefits of DevTest Lab, but more about how to create policies for DevTest Labs using Bicep. Although there is a good support for deploying DevTest labs with Bicep, there is little to no documentation when it comes to creating policies for DevTest Labs in Bicep. In this blog post, we will focus on creating policies for DevTest Labs using Bicep and how to go about doing this.
A Brief Overview of Azure DevTest Labs
Azure DevTest Labs is a managed service that enables developers to quickly create, manage, and share development and test environments. It provides a range of features and tools designed to streamline the development process, minimize costs, and improve overall productivity. By leveraging the power of the cloud, developers can easily spin up virtual machines (VMs) pre-configured with the necessary tools, frameworks, and software needed for their projects.
Existing Documentation Limitations
While the existing documentation covers various aspects of Azure DevTest Labs, it lacks clear guidance on setting up policies with DevTest Labs in Bicep. This blog post aims to address that gap by providing a Bicep script for creating a DevTest Lab and applying policies to it. Shout out to my colleague Illian Y for persisting and not giving up and finding a away around undocumented features and showing me.
Recently I got pulled into a production incident where a logic app was running for a long time (long time in this scenario was > 10 minutes), but the intention from the dev crew was they wanted this to time out in 60 seconds. These logic apps were a combination of HTTP triggers and Timer based.
Logic App Default Time Limits
First things to keep in mind are some default limits.
With that, here are a couple of quick ways to make sure your Logic App times out and terminates within the time frame you set. Lets say if we want our Logic App to run no more than 60 seconds at max then:
How to make a single-threaded app multi-threaded? This is the scenario I faced very recently. These were legacy web app(s) written to be single-threaded; in this context single-threaded means can only serve one request at a time. I know this goes against everything that a web app should be, but it what it is.
So if we have a single threaded web app (legacy) now all of a sudden we have a requirement to support multiple users at the same time. What are our options:
Re-architect the app to be multi threaded
Find a way to simulate multi threaded behavior
Both are great options, but in this scenario option 1 was out, due to the cost involved in re-writing this app to support multi threading. So that leaves us with option 2; how can we at a cloud infra level easily simulate multi threaded behavior. Turns out if we containerize the app (in this case it was easy enough to do) we orchestrate the app such that for each http request is routed to a new container (ie: every new http request should spin up a new container and request send to it)
Options For Running Containers
So when it comes to running a container in Azure our main options are below
Here is a scenario that I recently encountered. Imagine we are building micro-services using serverless (a mix on Azure Function Apps and Logic Apps) with APIM in the front. Lets say we went with the APIM standard instance and all the logic and function apps are going to be running on consumption plan (for cost reasons as its cheaper). This means we wont be getting any vnet capability and our function and logic apps will be exposed out to the world (remember to get vnet with APIM we have to go with the premium version, we are going APIM standard here for cost saving reasons).
So how do we restrict our function and logic apps to only go through the APIM, in another words all our function and logic apps must only go through the APIM and if anyone tries to access them directly they should be getting a “HTTP 403 Forbidden”.
Lets visualize this scenario; We have some WAF capable ingress endpoint, in this case its Azure Front Door, that is forwarding traffic to APIM which then sends the requests to the serverless apps. Reason for having Front Door before APIM is because APIM doesn’t have WAF natively so we will need to put something in front of it that has that capability to be secure.
There are few options like Azure Firewall, Application Gateway etc, but for the purposes of this scenario we have Azure Front Door in front of APIM (and we can have an APIM policy that will only accept traffic from Azure Font Door, we wont be going in to that, we will keep it to securing our function apps to just being available via APIM for today)