Extracting GZip & Tar Files Natively in .NET Without External Libraries

Extracting GZip & Tar Files Natively in .NET Without External Libraries


🎯 TL;DR: Native .tar.gz Extraction in .NET 7 Without External Dependencies

Processing compressed .tar.gz files in Azure Functions traditionally required external libraries like SharpZipLib. Problem: External dependencies increase complexity and security surface area. Solution: .NET 7 introduces native System.Formats.Tar namespace alongside existing System.IO.Compression for GZip, enabling complete .tar.gz extraction without external dependencies. Implementation uses GZipStream for decompression and TarReader for archive extraction with proper entry type filtering and async operations.


Introduction

Imagine being in a scenario where a file of type .tar.gz lands in your Azure Blob Storage container. This file, when uncompressed, yields a collection of individual files. The trigger event for the arrival of this file is an Azure function, which springs into action, decompressing the contents and transferring them into a different container.

In this context, a team may instinctively reach out for a robust library like SharpZipLib. However, what if there is a mandate to accomplish this without external dependencies? This becomes a reality with .NET 7.

In .NET 7, native support for Tar files has been introduced, and GZip is catered to via System.IO.Compression. This means we can decompress a .tar.gz file natively in .NET 7, bypassing any need for external libraries.

This post will walk you through this process, providing a practical example using .NET 7 to show how this can be achieved.

.NET 7: Native TAR Support

As of .NET 7, the System.Formats.Tar namespace was introduced to deal with TAR files, adding to the toolkit of .NET developers:

  • System.Formats.Tar.TarFile to pack a directory into a TAR file or extract a TAR file to a directory
  • System.Formats.Tar.TarReader to read a TAR file
  • System.Formats.Tar.TarWriter to write a TAR file

These new capabilities significantly simplify the process of working with TAR files in .NET. Lets dive in an have a look at a code sample that demonstrates how to extract a .tar.gz file natively in .NET 7.

Read more
Unzipping and Shuffling GBs of Data Using Azure Functions

Unzipping and Shuffling GBs of Data Using Azure Functions


🎯 TL;DR: Stream-Based Large File Processing in Azure Functions

Processing multi-gigabyte zip files in Azure Functions requires streaming approach due to 1.5GB memory limit on Consumption plan. Problem: Large compressed files cannot be loaded entirely into memory for extraction. Solution: Stream-based unzipping using blob triggers with two implementation options: native .NET ZipArchive (slower but dependency-free) vs SharpZipLib (faster with custom buffer sizes). Architecture includes separate blob containers for zipped/unzipped files with Function App triggered by blob storage events for scalable data processing.


Consider this situation: you have a zip file stored in an Azure Blob Storage container (or any other location for that matter). This isn’t just any zip file; it’s large, containing gigabytes of data. It could be big data sets for your machine learning projects, log files, media files, or backups. The specific content isn’t the focus - the size is.

The task? We need to unzip this massive file(s) and relocate its contents to a different Azure Blob storage container. This task might seem daunting, especially considering the size of the file and the potential number of files that might be housed within it.

Why do we need to do this? The use cases are numerous. Handling large data sets, moving data for analysis, making backups more accessible - these are just a few examples. The key here is that we’re looking for a scalable and reliable solution to handle this task efficiently.

Azure Data Factory is arguably a better fit for this sort of task, but In this blog post, we will specifically demonstrate how to establish this process using Azure Functions. Specifically we will try to achieve this within the constraints of the Consumption plan tier, where the maximum memory is capped at 1.5GB, with the supporting roles of Azure CLI and PowerShell in our setup.

Setting Up Our Azure Environment

Before we dive into scripting and code, we need to set the stage - that means setting up our Azure environment. We’re going to create a storage account with two containers, one for our Zipped files and the other for Unzipped files.

To create this setup, we’ll be using the Azure CLI. Why? Because it’s efficient and lets us script out the whole process if we need to do it again in the future.

  1. Install Azure CLI: If you haven’t already installed Azure CLI on your local machine, you can get it from here.

  2. Login to Azure: Open your terminal and type the following command to login to your Azure account. You’ll be prompted to enter your credentials.

    1
    az login    
  3. Create a Resource Group: We’ll need a Resource Group to keep our resources organized. We’ll call this rg-function-app-unzip-test and create it in the eastus location (you can ofcourse choose which ever region you like).

    1
    az group create --name rg-function-app-unzip-test --location eastus    
Read more
Securing Azure Functions and Logic Apps

Securing Azure Functions and Logic Apps


🎯 TL;DR: Cost-Optimized Security for Serverless Microservices

Consumption plan Function Apps and APIM Standard lack VNet integration for cost optimization but expose services publicly. Problem: Serverless microservices accessible directly bypassing API Management security policies. Solution: IP restriction-based security using APIM’s public IP address to whitelist only API Management access, configuring both main site and SCM site restrictions. Architecture includes Azure Front Door for WAF capabilities since APIM Standard lacks native WAF protection.


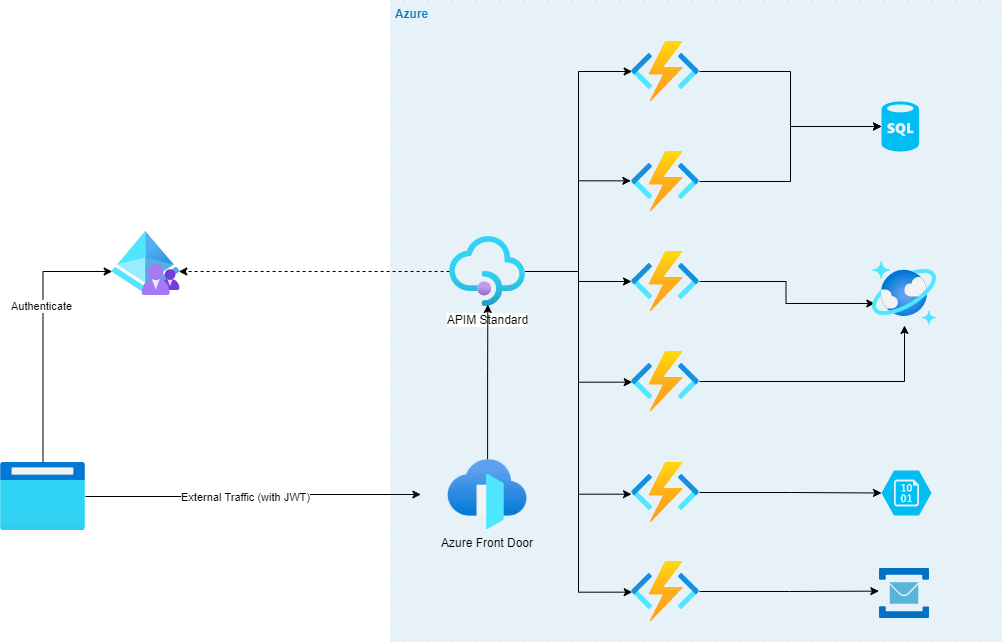
Here is a scenario that I recently encountered. Imagine we are building micro-services using serverless (a mix on Azure Function Apps and Logic Apps) with APIM in the front. Lets say we went with the APIM standard instance and all the logic and function apps are going to be running on consumption plan (for cost reasons as its cheaper). This means we wont be getting any vnet capability and our function and logic apps will be exposed out to the world (remember to get vnet with APIM we have to go with the premium version, we are going APIM standard here for cost saving reasons).

So how do we restrict our function and logic apps to only go through the APIM, in another words all our function and logic apps must only go through the APIM and if anyone tries to access them directly they should be getting a “HTTP 403 Forbidden”.

Lets visualize this scenario; We have some WAF capable ingress endpoint, in this case its Azure Front Door, that is forwarding traffic to APIM which then sends the requests to the serverless apps.
Reason for having Front Door before APIM is because APIM doesn’t have WAF natively so we will need to put something in front of it that has that capability to be secure.

There are few options like Azure Firewall, Application Gateway etc, but for the purposes of this scenario we have Azure Front Door in front of APIM (and we can have an APIM policy that will only accept traffic from Azure Font Door, we wont be going in to that, we will keep it to securing our function apps to just being available via APIM for today)

Read more