🎯 TL;DR: Distributed Development with Azure VMs and Dev Containers
This post details solving a distributed development challenge where 8 developers from different organizations needed to collaborate on an AutoGen AI project - 4 from restricted corporate environments unable to install development tools, and 4 external developers without access to client systems. The solution uses a shared Azure VM (Standard D8s v3) with individual user accounts, certificate-based SSH authentication, and VS Code Remote Development connected to a shared Dev Container environment. The architecture eliminates “works on my machine” issues by providing consistent development environments, shared resources (datasets, models, configs), and enables real-time collaboration.
Implementation highlights: Automated user provisioning scripts, VS Code Remote-SSH configuration, comprehensive devcontainer.json with pre-installed Python 3.12/AutoGen/Azure CLI, shared directory structures, and security hardening with fail2ban and UFW. Development environment setup scripts and configurations documented here
Introduction: When Traditional Solutions Hit a Wall
Last month, I found myself facing a challenge that I’m sure many of you have encountered: How do you enable seamless collaboration for a development team when half of them work in a locked-down environment where they can’t install any development tools, and the other half can’t access the client’s systems?
Our team of eight developers was tasked with building a proof-of-concept (PoC) for an AI-powered agentic system using Microsoft’s AutoGen framework. Here’s the kicker: this was a 3-week PoC sprint bringing together two teams from different organizations who had never worked together before. We needed a collaborative environment that could be spun up quickly, require minimal setup effort, and allow everyone to hit the ground running from day one.
The project requirements were complex enough, but the real challenge? Four developers worked from a highly restricted corporate environment where installing Python, VS Code, or any development tools was strictly prohibited. The remaining four worked from our offices but couldn’t access the client’s internal systems directly.
We tried the usual approaches:
- RDP connections: Blocked by security policies
- VPN access: Denied due to compliance requirements
- Local development with file sharing: Immediate sync issues and “works on my machine” problems
- Cloud IDEs: Didn’t meet the client’s security requirements
Just when we thought we’d have to resort to the dreaded “develop locally and pray it works in production” approach, we discovered a solution that not only solved our immediate problem but revolutionized how we approach distributed development.
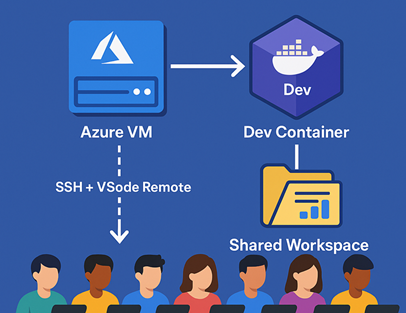
The Architecture That Worked For Us
Here’s a visual representation of what we built, everyone had to work on their personal (non-corporate) laptops for this to work.
flowchart TD
    A["� 8 Developers on Personal Laptops
4 Restricted + 4 External Teams"]

    B["� SSH + VS Code Remote Connection
Certificate-based Authentication"]

    C["☁️ Azure VM (Standard D8s v3)
8 vCPUs • 32GB RAM • Ubuntu 22.04"]

    D["👤 Individual User Accounts
user1, user2, user3... user8"]

    E["🐳 Shared Dev Container
Python 3.12 + AutoGen + Azure CLI
All Dependencies Pre-installed"]

    F["📂 Shared Development Resources
• Project Repository
• Datasets & Models
• Configuration Files"]

    G["✅ Results Achieved
94% Faster Onboarding
$400/month vs $16k laptops
Enhanced Security"]

    A --> B
    B --> C
    C --> D
    D --> E
    E --> F
    F --> G

    style A fill:#e3f2fd,stroke:#1976d2,stroke-width:3px,color:#000
    style B fill:#f3e5f5,stroke:#7b1fa2,stroke-width:3px,color:#000
    style C fill:#e1f5fe,stroke:#0277bd,stroke-width:3px,color:#000
    style D fill:#fff3e0,stroke:#f57c00,stroke-width:3px,color:#000
    style E fill:#f3e5f5,stroke:#7b1fa2,stroke-width:3px,color:#000
    style F fill:#fff3e0,stroke:#f57c00,stroke-width:3px,color:#000
    style G fill:#e8f5e8,stroke:#388e3c,stroke-width:3px,color:#000
Lets check out how this was built and setup…